Networking
How to Find Camera IP Address
Find the local address you need for manual setup and troubleshooting.
Read guide
Setup
Connect an IP camera to a Windows PC through your router, a network switch, Wi-Fi, PoE, or a direct Ethernet link, then verify the stream in surveillance software.
Check the camera label or manual for its power requirements, Ethernet/Wi-Fi capabilities, default setup method and login procedure. An Ethernet jack does not necessarily provide power. A camera that supports PoE needs a compatible PoE switch or injector unless it also has a separate power input.
Also decide whether the camera has already been initialized. Many current cameras require you to create an administrator password before the video stream becomes available. If the camera still uses a factory-default password, change it before keeping the device on your network.
This is the best starting point for most homes and small offices because the router can assign network addresses automatically.
Because both devices are on the same LAN, the camera's video can travel directly between the camera and PC without needing to leave the building or pass through a cloud service.
A switch is useful when you have several wired cameras. Connect the Windows PC and the cameras to the same network, usually with the switch also connected to the router. A PoE switch can power compatible cameras through their Ethernet cables.
The router still normally supplies DHCP addresses and Internet connectivity, while the switch provides additional network ports. For recording, the important point is that the PC and cameras can route traffic to each other.
A Wi-Fi camera does not usually connect wirelessly to the PC itself. Instead, both the camera and PC join the same wireless/router network. The PC can be wired while the camera is wireless; they can still communicate as long as the router allows traffic between them.
For first-time setup, follow the camera manufacturer's process to give the camera your Wi-Fi network name and password. Some cameras only support 2.4 GHz networks or particular Wi-Fi security modes, so check the specifications if setup fails.
After the camera joins Wi-Fi, verify that it remains reachable for several minutes before configuring recording. A camera that drops off the network during live view will also drop frames or create gaps during recording.
A direct Ethernet connection can work, but it is more advanced because there may be no router to assign addresses automatically. It is useful for bench testing, initial configuration, or an isolated one-camera setup.
ping if the device responds to ICMP.For example, if a camera is configured as 192.168.1.100 with a 255.255.255.0 mask, a PC address such as 192.168.1.50 can be in the same subnet. Do not copy those numbers blindly: use the actual network information for your camera.
Work through these checks in order:
If you do not know where the camera is on the network, read How to Find Camera IP Address.
In Security Eye, click Add Camera and choose Network (IP) camera. The wizard scans the network using supported discovery methods. Select the camera if it is found, or choose the manual-address option if you already know the camera's network/stream information.
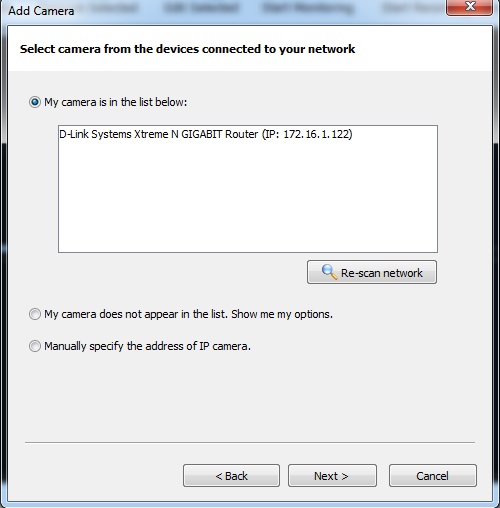
Enter the camera's own username and password, then use Connect & Test. A successful preview proves much more than discovery alone: the PC can reach the camera, the credentials are accepted, and the selected video profile can be opened.
For the product-specific sequence, see How to Add an IP Camera to Security Eye.
| Problem | What to check |
|---|---|
| Camera not found | Power, cabling, Wi-Fi association, DHCP list, network isolation and the camera IP address. |
| Login fails | Camera username/password, not the Windows or router credentials. |
| Web page opens but surveillance software fails | ONVIF/RTSP settings, stream path, codec/profile and camera connection limits. |
| Works by cable, not Wi-Fi | Wi-Fi band/security compatibility, password, signal quality and access-point isolation. |
| Works today, disappears later | Changing DHCP address; consider a DHCP reservation once the setup is stable. |
You need a stable way for the recorder to find the camera. A router-side DHCP reservation is often easier to manage than manually assigning addresses on every camera because the router keeps the address predictable while still controlling the network configuration. A static address configured on the camera can also work when it is planned correctly and kept outside conflicting DHCP assignments.
Whichever method you choose, document the camera name, IP address, login location and physical position. That small step saves a lot of troubleshooting when you add more cameras later.
Security Eye is video surveillance software for Windows with IP camera and webcam monitoring, recording, motion detection, scheduling, notifications, and remote web access.